


Happy 12th Day of Giftsmas, guys! Today’s post gets kind of personal because we’re going to talk about one of my biggest insecurities – my teeth! I should clarify though, it is not my bite that bothers me (I was one of those lucky ones that gets braces a second time as an adult), but rather the color of my teeth. And to be honest, the color of my teeth never really bothered me before this year. Over the summer though, I found myself smiling with my mouth closed a lot. I didn’t really think anything of it at first, but then I realized I was doing it because I was embarrassed of the color of my teeth.
Now, I wasn’t really doing anything to help my color situation either. You guys know I love me a big ole glass of red wine. I’m also a mom of two toddlers, which means up until I gave up caffeine about 4 weeks ago, I was having 2-3 cups of coffee a day for survival. So, between the coffee and the red wine, I was only worsening the color of my teeth. And I knew it. I just didn’t know what to do about it. Of course I had heard of teeth whitening before, but going to my dentist to whiten my teeth wasn’t a very appealing option. For one, I am a working mom, so finding the time to go to the dentist is not the easiest task. And secondly, I Didn’t want to have to spend a fortune to whiten my teeth.
I also knew that my teeth needed more help than just a couple of nights with white strips. I finally reached the point this Fall where I just couldn’t handle it anymore. As a blogger my smile is constantly in photos, and as a mom, I didn’t want to hate the pictures I took with my girls for something as silly as the color of my teeth. And that’s where Smile Brilliant came into play. Smile Brilliant, a company that uses the same whitening tray technology as your dentist, provided me with a super easy solution. Y’all, like super easy. Smile Brilliant allows you to do the entire process at home – even making your whitening trays! It kind of seems too good to be true, but it’s definitely not.
So how does it work? Well, once you order your customized tray kit, you will receive a nice little box on your porch. That box is like gold. It contains anything and everything you’ll need to whiten your teeth. The first thing you do is create your own molds. Yes, just like the ones you do at the dentist. You know, where they put that clay-like material in your mouth and have you bite down. Oh, and Smile Brilliant does walk you through the entire process of how to do it correctly so it’s fool proof. Once you create your molds you ship it back to Smile Brilliant and they use it to make your customized whitening trays. Then they send them back to you and the process can begin!
If you scroll down, you can read in detail the different steps to whitening with Smile Brilliant and a bit more about my experience. But, I couldn’t wait any longer to show you my before and after photos, so here they are…
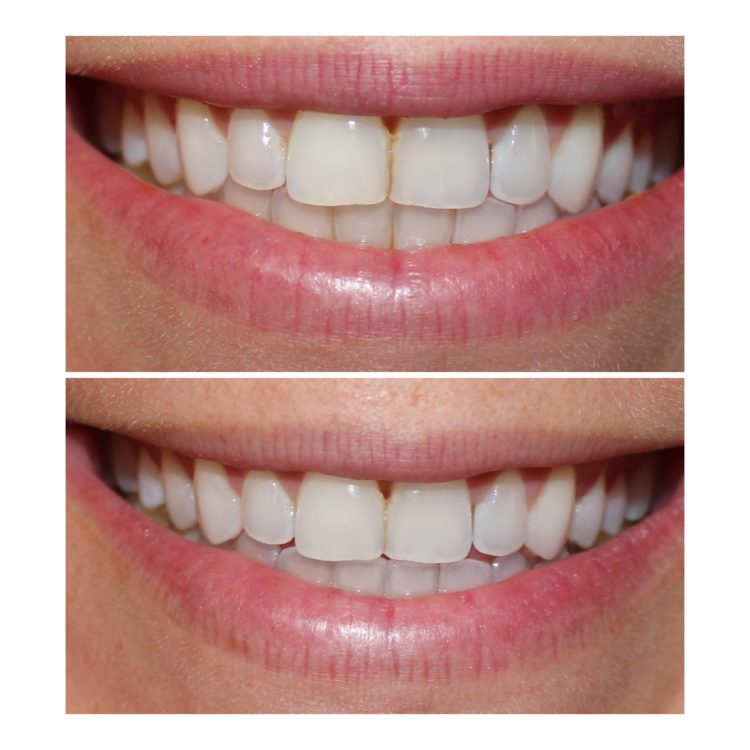
BEFORE/AFTER:
The top image is my before picture, and the bottom is 12 days after. When you look at the top picture you can tell that my front two teeth especially are discolored. I also have bonding in between my two front teeth and the bonding was most definitely discolored. In fact, I always felt like people probably thought I had food stuck in my teeth because it was so discolored.
The bottom image – my 12 days later photo – is markedly whiter. I wasn’t quite sure if I would be able to tell a big difference since my teeth were not “awfully yellow” in dental terms, but I could! The whitening trays made a big difference on the color of my bonding, too, which was huge for me.
HOW TO:
If you’re like me, you want to know all the details to how this works. So, below I’ve outlined the basic steps to whitening to help you get an idea of the time commitment and the whole process.
- Create molds for trays with home kit
- Send molds back to Smile Brilliant (in a prepaid package)
- Receive your customized whitening trays
- Use whitening trays for 7 – 12 sessions (preferably daily, but you can go every other if your teeth are sensitive)
- brush your teeth with water
- put 1//3-1/4 of whitening syringe in trays and put trays in mouth
- wear trays for 45 minutes – 3 hours
- remove tray and brush teeth with toothpaste
- put trays back in for 15 minutes with desensitizing gel
- You’re done!
MY EXPERIENCE:
Y’all, I loved it. Truly. It was honestly a super easy process and I got the result I was looking for – white teeth and therefore more confidence! I think the hardest part of this whole process was drinking white white instead of red while whitening my teeth.
I used my trays every night for 12 consecutive nights. My teeth are not that sensitive, so I was able to wear my whitening trays for 2 hours every night, too. (note: if you do have sensitive teeth, you can do it every other night and/or only wear them for 45 minutes) As part of the process you also use desensitizing gel for 15 minutes after each whitening session and I really do think that helps a lot with sensitivity. I will say that my teeth are ever so slightly more sensitive to really cold food or really hot food, but nothing that is detrimental or keeps me from my normal eating routines.
Smile Brilliant recommends that you use your whitening trays at night. This way, you aren’t tempted to eat or drink after, and that worked well for me. There were a couple of nights that I climbed into bed and realized I hadn’t whitened yet. So, I simply put them in, set an alarm on my phone and woke up and took them out (make sure that you do not leave your trays in for longer than 3 hours, this can cause severe gum irritation and sensitivity). No big deal.
If you still want to learn more facts, just click here. One of the most interesting and appealing facts I found is that Smile Brilliant products are cruelty-free and vegan! So cool, right? The other thing I found to be really unique and helpful is that if you hop on their website, a little box will pop up on your screen where you can chat with their support team. It’s super helpful! I actually asked them just today how often I could use the whitening trays per year. After all, with my red wine addition I know my teeth are bound to get discolored again. The support member at Smile Brilliant informed me that it is recommended that after you complete your 12 days of whitening, you do 1-2 additional applications every 4-6 months to prevent stains from reappearing.
Anyway, I hope you found this helpful and as always, if you have any questions please email me (hello@fleurdille.com) or leave a comment. Also, if you want to WIN a set for FREE, simply follow the instructions below!
WIN YOUR TEETH WHITENING TRAY HERE:
www.smilebrilliant.com/g/fleurdille
and/or
Get $15 off your tray with code: fleurdille15
*This giveaway will remain open for two weeks.*
This review was sponsored by Smile Brilliant. All opinions are my own. Thank you for supporting those brands that support Fleurdille.


